WQUXGA – IBM T221 3840×2400 204dpi Monitor – Part 6: Regressing Drivers and Xen

I recently built a new machine, primarily because I got fed up of having to stop what I’m working on and reboot from Linux into Windows whenever my friends and/or family invited me to join them in a Borderlands 2 session. Unfortunately, my old machine was just a tiny bit too old (Intel X38 based) to have full, bug-free VT-d/IOMMU support required for VGA passthrough to work, so after 5 years, I finally decided it was time to rectify this. More on this in another article, but the important point I am getting to is that VGA passthrough requires a recent version of Xen. And there this part of the story really begins.

Some of you may have figured out that RHEL derivatives are my Linux distribution of choice (RedSleeve was a big hint). Unfortunately, RedHat have dropped support for Xen Dom0 kernels in EL6, but thankfully, other people have picked up the torch and provide a set of up to date, supported Xen Dom0 kernels and packages for EL6. So far so good. But it was never going to be so simple, at a time when drivers are getting increasingly dumber, feature sparse and more bloated at the same time. That is really what this story is about.

For a start, a few details about the system setup that I am using, and have been using for years.

  • I am a KDE, rather than Gnome user. EL6 comes with KDE 4, which use X RandR rather than Xinerama extensions to establish the geometry of the screen layout. This isn’t a problem in itself, but there is no way to override whatever RandR reports, so on a T221 you end up with a regular desktop on half of the T221, and an empty desktop on the other, which looks messy and unnatural.
  • This is nothing new – I have covered the issue before in part 1 (ATI, fakexinerama) and part 3 (nvidia, twinview) of this series of articles. There are, however, further complications now:
  1. EL6 had had a Xorg package update that bumped the ABI version to from 10 to 11
  2. Nvidia drivers have changed the way TwinView works after version 295.x (TwinView option in xorg.conf is no longer recognized)
  3. Nvidia drivers 295.x do not support Xorg ABI v11.
  4. Nvidia kernel drivers 295.x do not build against kernels 3.8.x.

And therein lies the complication.

Nvidia drivers v295 when used with options TwinView and NoTwinViewXineramaInfo also seem to override RandR geometry to the show there is a single, large screen available, rather than two screens. This is exactly what we want when using the T221. Drivers after 295.x (304.x seems to be the next version), don’t recognize the TwinView configuration option, and while they provide Xinerama geometry override when using the NoTwinViewXineramaInfo option, they do not override RandR information any more. This means that you end up with a desktop that looks as you would expect it to if you used two separate monitors (e.g. status bar is only on the first screen, no wallpaper stretch, etc.), rather than a single, seamless desktop.

As you can see, there is a large compound issue in play here. We cannot use the 295.x drivers, because

  1. They don’t support Xorg ABI 11 – this can be solved by downgrading the xorg-x11-server-* and xorg-x11-drv-* packages to an older version (1.10 from EL 6.3). Easily enough done – just make sure you add xorg-x11-* to your exclude line in /etc/yum.conf after downgrading to avoid accidentally updating them in the future.
  2. They don’t build against 3.8.x kernels (which is what the Xen kernel I am using is – this is regardless of the long standing semi-allergy of Nvidia binary drivers to Xen). This is more of an issue – but with a bit of manual source editing I was able to solve it.

Here is how to get the latest 295.x driver (295.75) to build against Xen kernel 3.8.6. You may need to do this as root.

Kernel source acquisition and preparation:

wget http://uk1.mirror.crc.id.au/repo/el6/SRPMS/kernel-xen-3.8.6-1.el6xen.src.rpm
rpm -ivh kernel-xen-3.8.6-1.el6xen.src.rpm
cd ~/rpmbuild/SPEC
rpmbuild -bp kernel-xen.spec
cd ~/rpmbuild/BUILD/linux-3.8.6
cp /boot/config-3.8.6-1.el6xen.x86_64 .config
make prepare
make all

Now that you have the kernel sources ready, get the Nvidia driver 295.75, the patch, patch it and build it.

wget http://uk.download.nvidia.com/XFree86/Linux-x86_64/295.75/NVIDIA-Linux-x86_64-295.75.run
wget https://dl.dropboxusercontent.com/u/61491808/NVIDIA-Linux-x86_64-295.75.patch
bash ./NVIDIA-Linux-x86_64-295.75.run --extract-only
patch < NVIDIA-Linux-x86_64-295.75.patch
cd NVIDIA-Linux-x86_64-295.75
export IGNORE_XEN_PRESENCE=y
export SYSSRC=~/rpmbuild/BUILD/linux-3.8.6
cp /usr/include/linux/version.h $SYSSRC/include/linux/
./nvidia-installer -s

And there you have it Nvidia driver 295.75 that builds cleanly and works against 3.8.6 kernels. The same xorg.conf given in part 3 of this series will continue to work.

It is really quite disappointing that all this is necessary. What is more concerning is that the ability to use a monitor like the T221 is diminishing by the day. Without the ability to override what RandR returns, it may well be gone completely soon. It seems the only remaining option is to write a fakerandr library (similar to fakexinerama). Any volunteers?

It seems that Nvidia drivers are both losing features and becoming more bloated at the same time. 295.75 is 56MB. 304.88 is 65MB. That is 16% bloat for a driver that is regressively missing a feature, in this case an important one. Can there really be any doubt that the quality of software is deteriorating at an alarming rate?

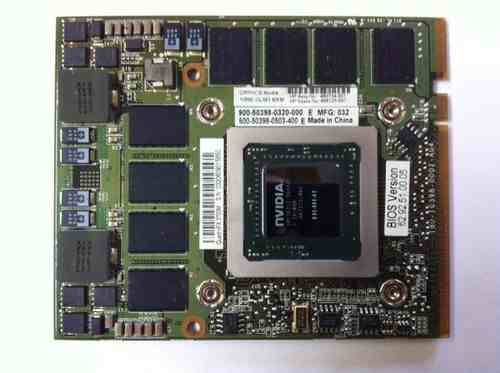
Clevo M860TU / Sager NP8662 / mySN XMG5 GPU (GTX260M / FX 3700M) Replacement / Upgrade and Temperature Management Modifications

Recently, my wife’s Clevo M860TU laptop suffered a GPU failure. Over our last few Borderlands 2 sessions, it would randomly crash more and more frequently, until any sort of activity requiring 3D acceleration refused to work for more than a few seconds. The temperatures as measured by GPU-Z looked fine (all our computers get their heatsinks and fans cleaned regularly), so it looked very much like the GPU itself was starting to fail. A few days later, it failed completely, with the screen staying permanently blank.

The original GPU in it was an Nvidia GTX260M. These proved near impossible to come by in MXM III-HE form factor. Every once in a while a suitable GTX280M would turn up on eBay, but the prices were quite ludicrous (and consequently they would never sell, either). Interestingly, Nvidia Quadro FX 3700M MXM III-HE modules seem to be fairly abundant and reasonably priced. This is interesting considering that they cost several times more than the GTX280M new. Their spec (128 shaders, 75W TDP) is identical.

MXM-III HE Nvidia Quadro FX 3700M

The GTX260M has 112 shaders and a lower TDP of 65W, so the cooling was going to be put under increased strain (especially since I decided to upgrade it from a dual core to a quad core CPU at the same time – more on that later). Having fitted it all (it is a straight drop-in replacement, but make sure you use shims and fresh thermal pads for the RAM if required to ensure proper thermal contact with the heatsink plate), I ran some stress tests.

Within 10 minutes of OCCT GPU test, it hit 97C, and started throttling and producing errors. I don’t remember what temperatures the GTX260M was reaching before, but I am quite certain it was not this high. I had to find a way to reduce the heat production of the GPU. Given the cooling constraints in a laptop, even a well designed one like the Clevo M860TU, the only way to reduce the heat was by reducing either the clock speed or the voltage – or both. Since the heat produced by a circuit is proportional to the multiple of the clock speed and the square of the voltage, reducing the voltage has a much bigger effect than reducing the clock speeds. Of course, reducing the voltage necessitates a reduction in clock speed to maintain stability. The only way to do this on an Nvidia GPU is by modifying the BIOS. Thankfully, the tools for doing so are readily available:

After some experimentation, it wasn’t difficult to find the optimal setting given the cooling constraints. The original settings were:

  • Core: 550MHz
  • Shaders:1375MHz
  • Memory: 799MHz (1598MHz DDR)
  • Voltage: 1.03V (Extra)
  • Temperature: Throttles  at 97C and gets unstable (OCCT GPU test)
  • FPS: ~17

The settings I found that provided 100% stability and reduced the temperatures down to a reasonable level are as follows:

  • Core: 475MHz
  • Shaders: 1250MHz
  • Memory: 799MHz (1598MHz DDR)
  • Voltage: 0.95V (Extra)
  • Temperature: 82C peak (OCCT GPU test)
  • FPS: ~16

The temperature drop is very significant, but the performance reduction is relatively minimal. It is worth noting that OCCT is specifically designed to produce maximum heat load. Playing Borderlands 2 and Crysis with all the settings set to maximum at 1920×1200 resulted in peak temperatures around 10C lower than the OCCT test.

While I had the laptop open I figured this would be a good time to upgrade the CPU as well. Not that I think that the 2.67Hz P9600 Core2 was underpowered, but with the 2.26GHz Q9100 quad core Core2s being quite cheap these days, it seemed like a good idea. And considering that when overclocking the M860TU from 1066 to 1333FSB I had to reduce the multiplier on the P9600 (not that there was often any need for this), the Q9100’s lower multiplier seemed like a promising overall upgrade. The downside, of course, was that the Q9100 is rated to a TDP of 45W compared to P9600’s 25W. Given the heatsink on the Clevo M860TU is shared between the CPU and the GPU, this no doubt didn’t help the temperatures observed under OCCT stress testing. Something could be done about this, too, though.

Enter RMClock – a fantastic utility for tweaking VIDs to achieve undervolting on x86 CPUs at above minimum clock speed. Intel Enhanced SpeedStep reduces both the clock speed and the voltage when applying power management. The voltage VID and clock multipliers are overrideable (within the minimum and maximum for both hard-set in the CPU), which means that in theory, with a very good CPU, we could run the maximum multiplier and minimum VID to reduce power saving. In most cases, of course, this would result in instability. But, it turns out, my Q9100 was stable under several hours of OCCT testing at minimum VID (1.05V) at top multiplier (nominal VID 1.275V). This resulted in a 10C drop in peak OCCT CPU load tests, and a 6C drop in peak OCCT GPU load tests (down to 76C from 82C peak).

WQUXGA – IBM T221 3840×2400 204dpi Monitor – Part 5: When You Are Really Stuck With a SL-DVI

I recently had to make one of these beasts work bearably well with only a single SL-DVI cable. This was dictated by the fact that I needed to get it working on a graphics card with only a single DVI output, and my 2xDL-DVI -> 2xLFH-60 adapter was already in use. As I mentioned previously, I found the standard 1xSL-DVI’s worth 13Hz to be just too slow when it comes to a refresh rate (I could see the mouse pointer skipping along the screen), but the default 20Hz from 2xSL-DVI was just fine for practically any purpose.

So, faced with the need to run with just a single SL-DVI port, it was time to see if a bit of tweaking could be applied to reduce the blanking periods and squeeze a few more FPS out of the monitor. In the end, 17.1Hz turned out to be the limit of what could be achieved. And it turns out, this is sufficient for the mouse skipping to go away and make the monitor reasonably pleasant to use.

(Note: My wife disagrees – she claims she can see the mouse skipping at 17.1Hz. OTOH, she is unable to read my normal font size (MiscFixed 8-point) on this monitor at full resolution. So how you get along with this setup will largely depend on whether your eyes’ sensitivity is skewed toward high pixel density or high frame rates.)

The xorg.conf I used is here:

Section "Monitor"
  Identifier    "DVI-0"
  HorizSync    31.00 - 105.00
  VertRefresh    12.00 - 60.00
  Modeline "[email protected]"  165.00  3840 3848 3880 4008  2400 2402 2404 2406 +hsync +vsync
EndSection

Section "Device"
  Identifier    "ATI"
  Driver        "radeon"
EndSection

Section "Screen"
  Identifier    "Default Screen"
  Device        "ATI"
  Monitor        "DVI-0"
  DefaultDepth    24
  SubSection "Display"
    Modes    "[email protected]"
  EndSubSection
EndSection

The Modeline could easily be used to create an equivalent setting in Windows using PowerStrip or a similar tool, or you could hand-craft a custom monitor .inf file.

In the process of this, however, I have discovered a major limitation of some of the Xorg drivers. Generic frame buffer (fbdev) and VESA (vesa) drivers do not support Modelines, and will in fact ignore them. ATI’s binary driver (fglrx) also doesn’t support modelines. Linux CCC application mentions a section for custom resolutions, but there is no such section in the program. So if you want to use a monitor in any mode other than what it’s EDID reports, you cannot use any of these drivers. This is a hugely frustrating limitation. In the case of fbdev driver, it is reasonably forgiveable because it relies on whatever modes the kernel frame buffer exposes. In the case of the VESA driver it is understandable that it only supports standard VESA modes. But ATI’s official binary driver lacking this feature is quite difficult to forgive – it has clearly be dumbed down too far.