
Recently, my wife’s Clevo M860TU laptop suffered a GPU failure. Over our last few Borderlands 2 sessions, it would randomly crash more and more frequently, until any sort of activity requiring 3D acceleration refused to work for more than a few seconds. The temperatures as measured by GPU-Z looked fine (all our computers get their heatsinks and fans cleaned regularly), so it looked very much like the GPU itself was starting to fail. A few days later, it failed completely, with the screen staying permanently blank.
The original GPU in it was an Nvidia GTX260M. These proved near impossible to come by in MXM III-HE form factor. Every once in a while a suitable GTX280M would turn up on eBay, but the prices were quite ludicrous (and consequently they would never sell, either). Interestingly, Nvidia Quadro FX 3700M MXM III-HE modules seem to be fairly abundant and reasonably priced. This is interesting considering that they cost several times more than the GTX280M new. Their spec (128 shaders, 75W TDP) is identical.
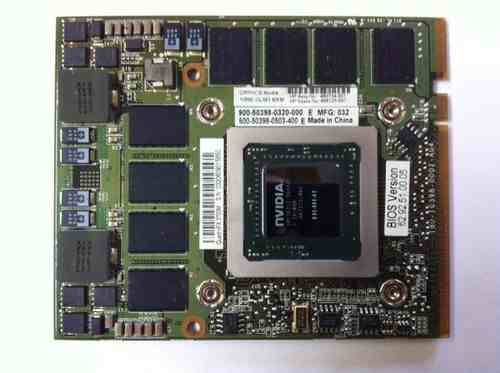
The GTX260M has 112 shaders and a lower TDP of 65W, so the cooling was going to be put under increased strain (especially since I decided to upgrade it from a dual core to a quad core CPU at the same time – more on that later). Having fitted it all (it is a straight drop-in replacement, but make sure you use shims and fresh thermal pads for the RAM if required to ensure proper thermal contact with the heatsink plate), I ran some stress tests.
Within 10 minutes of OCCT GPU test, it hit 97C, and started throttling and producing errors. I don’t remember what temperatures the GTX260M was reaching before, but I am quite certain it was not this high. I had to find a way to reduce the heat production of the GPU. Given the cooling constraints in a laptop, even a well designed one like the Clevo M860TU, the only way to reduce the heat was by reducing either the clock speed or the voltage – or both. Since the heat produced by a circuit is proportional to the multiple of the clock speed and the square of the voltage, reducing the voltage has a much bigger effect than reducing the clock speeds. Of course, reducing the voltage necessitates a reduction in clock speed to maintain stability. The only way to do this on an Nvidia GPU is by modifying the BIOS. Thankfully, the tools for doing so are readily available:
After some experimentation, it wasn’t difficult to find the optimal setting given the cooling constraints. The original settings were:
- Core: 550MHz
- Shaders:1375MHz
- Memory: 799MHz (1598MHz DDR)
- Voltage: 1.03V (Extra)
- Temperature: Throttles at 97C and gets unstable (OCCT GPU test)
- FPS: ~17
The settings I found that provided 100% stability and reduced the temperatures down to a reasonable level are as follows:
- Core: 475MHz
- Shaders: 1250MHz
- Memory: 799MHz (1598MHz DDR)
- Voltage: 0.95V (Extra)
- Temperature: 82C peak (OCCT GPU test)
- FPS: ~16
The temperature drop is very significant, but the performance reduction is relatively minimal. It is worth noting that OCCT is specifically designed to produce maximum heat load. Playing Borderlands 2 and Crysis with all the settings set to maximum at 1920×1200 resulted in peak temperatures around 10C lower than the OCCT test.
While I had the laptop open I figured this would be a good time to upgrade the CPU as well. Not that I think that the 2.67Hz P9600 Core2 was underpowered, but with the 2.26GHz Q9100 quad core Core2s being quite cheap these days, it seemed like a good idea. And considering that when overclocking the M860TU from 1066 to 1333FSB I had to reduce the multiplier on the P9600 (not that there was often any need for this), the Q9100’s lower multiplier seemed like a promising overall upgrade. The downside, of course, was that the Q9100 is rated to a TDP of 45W compared to P9600’s 25W. Given the heatsink on the Clevo M860TU is shared between the CPU and the GPU, this no doubt didn’t help the temperatures observed under OCCT stress testing. Something could be done about this, too, though.
Enter RMClock – a fantastic utility for tweaking VIDs to achieve undervolting on x86 CPUs at above minimum clock speed. Intel Enhanced SpeedStep reduces both the clock speed and the voltage when applying power management. The voltage VID and clock multipliers are overrideable (within the minimum and maximum for both hard-set in the CPU), which means that in theory, with a very good CPU, we could run the maximum multiplier and minimum VID to reduce power saving. In most cases, of course, this would result in instability. But, it turns out, my Q9100 was stable under several hours of OCCT testing at minimum VID (1.05V) at top multiplier (nominal VID 1.275V). This resulted in a 10C drop in peak OCCT CPU load tests, and a 6C drop in peak OCCT GPU load tests (down to 76C from 82C peak).